

Last weekend I started making a new Normandy house for my ever-lasting Normandy Project (perhaps I should rename it this way), but while I was planning it I thought to use it for a tutorial post in my blog!
I have taken photos for each step of the building-making process, so as to make it as clear as possible for anyone interested in making his own buildings!
I reckon that it is an easy process - but believe me, I have ruined many buildings up until now, and yet I have plenty more to learn! If you face any problems while making them please feel free to contact me! I do commissions!! :-)
So, time for me to start:
1st Step - Materials needed:
The first and most important material you will need would be good old coffee!!!A nice cup of good blended coffee (especially if you work late at night as my self does)!
The first and most important material you will need would be good old coffee!!!A nice cup of good blended coffee (especially if you work late at night as my self does)!

2nd Step - Other materials needed:
* A ball point pen
* A steel ruler
* X Acto knives
* Sheets of foamcore cards. I usually use 0.5cm sheets, for durability reasons. This width, tends not to warp when you apply materials on it (plaster, colours).
* 0.5cm Card (windows and doors casings)
* PVA Glue
* UHU Stick glue
* Pins
* Vallejo's White Pumice
* A big Flat brush
* Acrylic colours. I personally use Crafter's Acrylics. They come in many colours and they apply really well on the house's surfaces.
* Cotton buds!! Yes, yes, cotton buds. I personally use them for the chimneys - you know the three spikey things... :-)
* Balsa wood. I use 2mm sheets, for my second's storey floor.
* Plastic doors and windows. I personally use Wills materials - OO Scale. In this tutorial I will use Wills SS86 Doors and windows kit
* Plastic floor tiles.I get them from a local manufacturer here in Athens. They come in 30x30cm pieces, 3mm height and they get cut very well and hold their shape, without warping!I believe you can find sth similar in your local store, wherever you are!
I believe that this is what you will need in general. In case I forgot about sth, I will mention afterwards.
Now, we are ready to move to the third step!
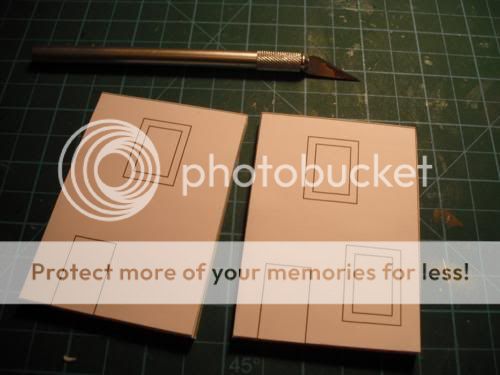
3rd Step - Placing the templates and cutting
Use UHU stick glue to glue the house templates. After the cutting, take off the paper templates from the foamcore.

I have made some templates for my buildings, which I usually use on the foamcore sheets, so as to be able to save time and patience credits, while cutting!

4th Step - Cutting the templates

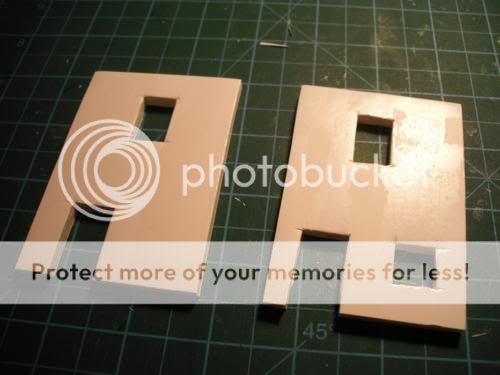
5th Step - Cutting the Doors and Windows cases
I use a sharp X Acto blade and a steel ruler, so as to cut the doors and windows cases (gaps). Be very careful while doing this! You either may lose a foamcore sheet or a finger. What suits you best! ;-)
After doing that, remove the paper templates, and let the foamcore sheets ''free''!!
I use a sharp X Acto blade and a steel ruler, so as to cut the doors and windows cases (gaps). Be very careful while doing this! You either may lose a foamcore sheet or a finger. What suits you best! ;-)
After doing that, remove the paper templates, and let the foamcore sheets ''free''!!
6th Step - Gluing the wall components
After cutting the walls, use PVA glue and pins to attach the wall compontents together.
Simply apply some PVA on the places you want to be glued and after that stick the pins to the side of the walls for better stability. Before applying the pins, remove the pins heads!
After cutting the walls, use PVA glue and pins to attach the wall compontents together.
Simply apply some PVA on the places you want to be glued and after that stick the pins to the side of the walls for better stability. Before applying the pins, remove the pins heads!


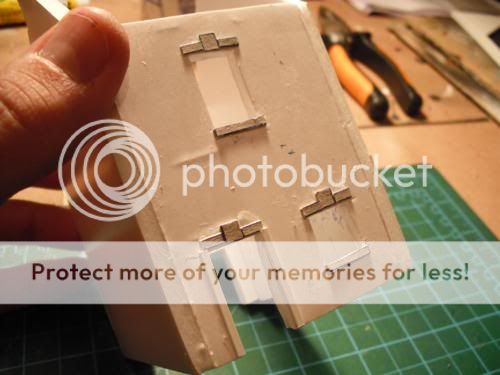
7th Step - Making the second floor preparation
In this photo (I apologize for the blur photo - it was taken late at night), I am showing 4.2cm height foamcore pieces that I used in order to be able to make a second floor in my building.The second floor will be made from balsa wood (2mm sheet). The exact height of the foamcore pieces (4.2cm) might vary, but I used a kneeling firing figure for reference. When you want to put figures in the buildings, you will want to be visible behing the windows slits! I know it seems generic, but the building is made primarily for wargame reasons. When I improve myself I'll try a different approach on this aspect of building making! So please be tolerant! :-)
In this photo (I apologize for the blur photo - it was taken late at night), I am showing 4.2cm height foamcore pieces that I used in order to be able to make a second floor in my building.The second floor will be made from balsa wood (2mm sheet). The exact height of the foamcore pieces (4.2cm) might vary, but I used a kneeling firing figure for reference. When you want to put figures in the buildings, you will want to be visible behing the windows slits! I know it seems generic, but the building is made primarily for wargame reasons. When I improve myself I'll try a different approach on this aspect of building making! So please be tolerant! :-)

8th Step - Making the Doors and Windows casemates
In this photo sequence, I am showing you what I used for the doors and windows casemates. It is 0.5cm card. The dimensions may vary to taste, but what I did was:
Doors: W:2.5cm H:0.3cm
Windows: W:1.5cm H:0.3cm
In this photo sequence, I am showing you what I used for the doors and windows casemates. It is 0.5cm card. The dimensions may vary to taste, but what I did was:
Doors: W:2.5cm H:0.3cm
Windows: W:1.5cm H:0.3cm


9th Step: Applying the White Pumice
In this photo sequence I am showing the application of Vallejo's White pumice ''plaster'' on the buildings' walls. It can be applied very easily, with a simple flat brush.
After the application you need to let it dry overnight. After that paint can be applied.
In this photo sequence I am showing the application of Vallejo's White pumice ''plaster'' on the buildings' walls. It can be applied very easily, with a simple flat brush.
After the application you need to let it dry overnight. After that paint can be applied.


This is the end of the first part. I apologize for not finishing the tutorial today, but I had to get some sleep!!!I hope you understand.... :-)
In the next post I will show you the painting parts of the tutorial, so stay tuned!
Hope it helped you a bit!
In the next post I will show you the painting parts of the tutorial, so stay tuned!
Hope it helped you a bit!
T.


Excellent. You make it look easy.
ReplyDeleteVery cool T, any plans to do stuff from other theatres down the track
ReplyDeleteOh good show Thanos, this is a good look at what goes into creating your masterpieces.
ReplyDeleteKeep it up!
Really useful stuff. Now, I need to go and make myself some. Keep it up πατριωτη...
ReplyDeleteDimitri
Very nice house building tutorial, more or less i use the same system, but i use "black lava" and not "white pumice", but this is cos i always print in black!!! Well done like always Thanos, how many buildings u have at the moment??
ReplyDeleteGood tutorial! Thank you!
ReplyDeleteI´m useless when it comes to building houses etc...nice tutorial :-)
ReplyDeleteIsn´t that Baldrick as your avatar ? a Very cunning plan :-)
Cheers
Paul
Very handy tutorial.funny,because I discovered that foam on a site tonight and thought that would useful,and the I used the vallejo dark mud effect on some florist foam/wet brick for plaster.
ReplyDeleteVery generous of you to share your knowledge!
ReplyDeleteI have some foamcore and other things that are sitting around waiting to be used - you've given some training so now I'll try to make building some buildings a higher priority.
A++ T, This is excellent.
ReplyDeleteGReg
Thank you all for your kind words!
ReplyDeleteI hope to be able to finish this house by the end of the week in order to keep track with the 1st part!
@Alex: Right now I think I have almost 20 houses. There are some that don't fit very well together, but quantity is always quantity! :-)
@Easternfunker: Knowledge should be spread, otherwise it becomes obsolete. All of you help me with your blogs also, so I reckon it is a fair deal! :-)
Thanks everyone!
T.
gr8 tutorial, I want to see more
ReplyDeleteThanks for the tutorial! I look forward to seeing the final result.
ReplyDeleteExcellent tutorial Thanos. Any chance of you making your template available?
ReplyDeleteI'm a but of a newbie at building, but would like to give it a shot, and I'm sure others would appreciate it as well.
Cheers,
Jeremy
Wild. I just looked at this and your method is exactly he same as mine - foam core, pins, white pumice …
ReplyDeleteLove your tutorials. Why buy when you can build?
It's a pity you don't have a donate button! I'd definitely donate to this brilliant blog! I suppose for now i'll settle for bookmarking and adding your RSS feed to my Google account.
ReplyDeleteI look forward to brand new updates and will share this blog with my
Facebook group. Chat soon!
Feel free to visit my homepage; best diet plan
My web site :: Diet plans
You cannot miss best 2022 rolex replica watches with Swiss movements! Place an order online quickly!
ReplyDelete